Virtual Adventures

Scenario: Mount base and differencing VHD disks using Windows Virtual PC on Windows 7 x64.

Dude, did you run out of BI stuff to talk about? I didn’t but I think other folks may benefit from my experience especially MCTs who have discovered that Windows 7 hasn’t happened yet to the Microsoft Official Curriculum and resorted to all sorts of hacks to get Virtual Server 2005 or Lab Launcher working with Windows 7. In the process, I’ve learned a lot about the virtualization technology that goes beyond just mounting disks. OK, I have a hidden agenda to write this blog as well – I want to document these steps.

So, I am preparing to teach 6326A – Implementing and Maintaining Microsoft SQL Server 2008 Reporting Services in an instructor-led environment where I have to install the required software on the student’s machine. After downloading the trainer resources, I have discovered that Microsoft provides 6236A-NY-SQL-01.vhd disk which requires a base disk Base08A.vhd. Reading the setup guide included in the course revealed that Microsoft wants me to install Virtual Server 2005 on both the instructor and students machines.

Gotcha 1: Virtual Server 2005 doesn’t run on Windows 7. Browsing the MCT private groups I came across posts discussing a hack around this limitation but I didn’t want go that way. Not to mention that Microsoft Lab Launcher, which apparently is intended to simplify the VHD deployment to student machines, doesn’t run on Win 7 as well. A double-gotcha which picked up my interest and stirred my hacking instincts to get the whole thing working with Virtual PC. After all, I can’t control what OS the students run or the training center has installed.

OK, but this is just VHD disk, isn’t it? So, it should run on Windows Virtual PC, right? So, I created a new virtual machine and attempted to mount 6236A-NY-SQL-01.vhd but I was greeted with the following informative error:

Cannot attach the virtual hard disk to the virtual machine. Check the values provided and try again.

Then I mounted Base08A.vhd and I was able to boot the VM only to find out that it includes the Windows Server 2008 OS only. Where is the cool SQL Server BI stuff? This is the part where I realized that my virtual knowledge needs brushing up. Enter differencing disks. This of course is not explained in the setup document, so don’t try to find it there. I figured that Base08A.vhd is the base disk that has the OS only while the 6236A-NY-SQL-01.vhd is the differencing disk that has the rest (SQL Server 2008 + Reporting Services samples and Adventure Works database) installed. To prove my hypothesis, I used the Sun’s VirtualBox. I use VirtualBox for my personal VM work because it supports x64 guess OS, which Virtual PC doesn’t support (shame). I used the Disk Manager to add both the base and difference images and … lo and behold, the VM booted up and I was able to verify that SQL Server 2008 and rest of the goodies are installed.

But I didn’t want to force the students to install VirtualBox so I continued hacking my way to Windows Virtual PC. In a Eureka moment, I examined the Windows Event log and saw the following message:

The parent virtual hard disk ‘C:\Program Files\Microsoft Learning\Base\Base08A.vhd’ for the differencing virtual hard disk ‘C:\VPC\3263\6236A-NY-SQL-01.vhd’ does not exist. Please reconnect the differencing virtual hard disk to the correct parent virtual hard disk.

So, the base disk path is hardcoded in the differencing image. The following commands confirmed this.

  1. Went to command prompt and entered (the actual commands are in bold):

    C:\>Diskpart

    DISKPART> select vdisk file=”c:\vpc\6236\6236A-NY-SQL-01.vhd”

    DiskPart successfully selected the virtual disk file.

    DISKPART> detail vdisk

    Device type ID: 2 (VHD)

    Vendor ID: {EC984AEC-A0F9-47E9-901F-71415A66345B} (Microsoft Corporation)

    State: Added

    Virtual size: 64 GB

    Physical size: 9 GB

    Filename: c:\vpc\6236\6236A-NY-SQL-01.vhd

    Is Child: Yes

    Parent Filename: C:\Program Files\Microsoft Learning\Base\Base08A.vhd

    Associated disk#: Not found.

  2. I moved the based image (Base08A.vhd) to C:\Program Files\Microsoft Learning\Base. With a baited breath, I repeated the process of creating a new virtual machine in Windows Virtual PC pointing to the existing 6236A-NY-SQL-01.vhd but I got the first error:

    Cannot attach the virtual hard disk to the virtual machine. Check the values provided and try again.

    No more details in the Windows event log. At this point, I posted a question to the Windows 7 Virtualization discussion forum and I was clued in the disk virtual size (not physical size) could be the issue since Virtual PC doesn’t support disks larger than 127 GB. Although after attaching the 6236A-NY-SQL-01.vhd using the Windows 7 Disk Manager I could see that the virtual size is 64 GB, I compacted the base disk using these steps. That didn’t help and the hour was getting late. So I threw the white towel on the differencing disk approach (for now) and decided to merge the differencing disk into the base disk.

    Assuming the commands in step 1), I executed the following commands:

    DISKPART>detach vdisk

    DiskPart successfully detached the virtual disk file.

    DISKPART>merge vdisk depth=1

    100 percent complete

    (after a long wait …)

    DiskPart successfully merged the differencing chain.

    Now that I had the disks merged I was able to create a new virtual machine successfully using the base disk image (Base08A.vhd) which combined both the original and differencing disks. Since the differencing disk was merged, I could delete 6236A-NY-SQL-01.vhd.

Gotcha 2: After booting the virtual machine, I was able to log in using the pre-defined Student account. However, attempting to run the SQL Server Management Studio, I got an error that the SQL Server 2008 evaluation period has expired. I attempted to reset the Windows Server 2008 (guest OS) system date, but after a few seconds the date would revert to the present date. More binging the Internet solved the issue.

  1. Shut down the VM.
  2. Open the vmc file in Notepad.
  3. Chang the last six digits to a year ago (070109)
    <time_bytes type=”bytes”>57002400060004070109</time_bytes>
  4. Further down the file, disable guest-to-host OS time synchronization:
    <host_time_sync>

    <enabled type=”boolean”>false</enabled>

    <frequency type=”integer”>15</frequency>

    <threshold type=”integer”>10</threshold>

    </host_time_sync>

  5. Boot VM. Now change the system date to 07-01-09.

    Success!

Most Requested Features

You can use the Microsoft Connect website to find most requested features. Unfortunately, the search doesn’t let you specify a product so the search results may be related to other products. For example, searching on reporting services may bring in results from Analysis Services and reporting. Nevertheless, it was quite interesting to find the top voted suggestions. For example, the following query shows the top suggestions for Reporting Services (flip to the Suggestions tab):

https://connect.microsoft.com/SQLServer/SearchResults.aspx?KeywordSearchIn=2&SearchQuery=%22reporting%22+AND+%22services%22&FeedbackType=1&Scope=0&SortOrder=10&TabView=0&wa=wsignin1.0

  1. Reporting Services-Recognize multiple result sets returned from a stored procedure – (50 votes)
  2. Merging / Linking datasets on report level (50 votes) – No 6 on my SSRS Top 10 wish list.
  3. SQL Reports should support stylesheets (43 votes) – No 9 on my list.
  4. Support for XML Paper Specification (XPS) Output Format (29 votes) – I am personally surprised about this one.
  5. Reporting Services Security Using Membership and Roles (29 votes), and so on

Running ReportViewer Under Trusted Account

Scenario: You have an Internet-facing web application that uses the Visual Studio ReportViewer control to render reports. The application takes care of authenticating the users. You want all report requests to the report server to go under a single (trusted) Windows account. There are at least two approaches to implement this scenario:

Basic Authentication

You can configure ReportViewer for basic authentication by implementing the Microsoft.Reporting.WebForms.IReportServerCredentials interface, as follows:

[Serializable]

public class MyReportServerCredentials : IReportServerCredentials

{

public MyReportServerCredentials()

{

}

public WindowsIdentity ImpersonationUser

{

get

{

return null;

}

}

public ICredentials NetworkCredentials

{

get

{

return new NetworkCredential(

ConfigurationManager.AppSettings[“reportUser”],

ConfigurationManager.AppSettings[“reportPassword”]

, “<your domain here>” – comment out this line if a domain account is used as a trusted account

);

}

}

public bool GetFormsCredentials(out Cookie authCookie, out string user, out string password, out string authority)

{

authCookie = null;

user = null;

password = null;

authority = null;

return false;

}

}

Specifically, you need to implement the NetworkCredentials property of IReportServerCredentials. In my case, I read the trusted account credentials from web.config. Once IReportServerCredentials is implemented, you need to configure ReportViewer to use it. This takes one line of code:

reportViewer.ServerReport.ReportServerCredentials = new MyReportServerCredentials();

The advantage of using IReportServerCredentals if flexibility. You can retrieve the account credentials from any place, such as security service, configuration file, database, etc. In addition, the impersonation is scoped for ReportViewer only. Other network calls made by the applications are unaffected.

Process Identity

The issue with IReportServerCredentals is the application must deal with the credentials of the trusted account, including the password. For added level of security, I try my best to avoid handling passwords and use Windows authentication whenever I can. Therefore, my preferred approach is to change the process identify of the web application. One way to do this is to change the identity of the IIS application pool the web application is running under, as follows:

  1. If you don’t have a domain account to use as a trusted account, create a new domain account.
  2. On the web server, add the account to the IIS_WPG local Windows group to give it the necessary rights to be used as an application pool account.
  3. In the IIS Manager, expand the server name, right-click the Application Pools folder, and click New Application Pool.
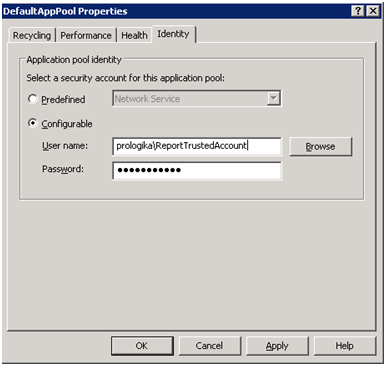
  4. Give the new pool a name. In the pool Properties page, click the Identity tab, select the Configurable option, and enter the credentials of the trusted account.121609_0031_RunningRepo1
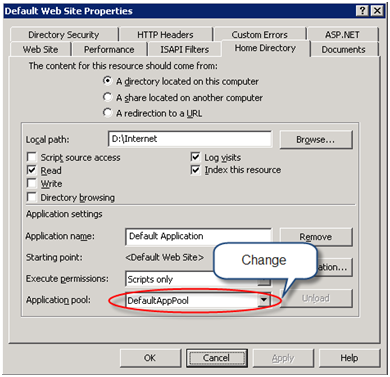
  5. Open the web application properties and change its application pool to the pool you just created.121609_0031_RunningRepo2
  6. If present, remove <identity impersonate=”true”/> element from the application web.config file so the network calls are made under the process identify instead of the anonymous user account, such as IUSR_<MACHINE_NAME>.
  7. At this point, if you run the web application, you may get a permission error because the domain account doesn’t have the necessary rights to specific folders, such as the web application folder and the temp folder. Using Windows Explorer, grant the domain account (or IIS_WPG group) rights to these folders. The error message should include the path of the folder you need to grant access to.
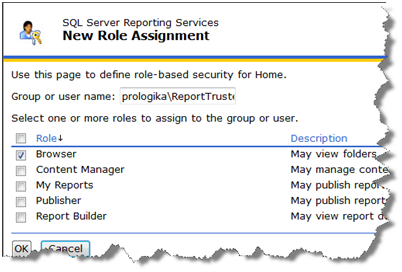
  8. Finally, use the Report Manager to grant the necessary rights to the trusted account, such as Browser, to the required folders.121609_0031_RunningRepo3

Infragistics Silverlight for Analysis Services

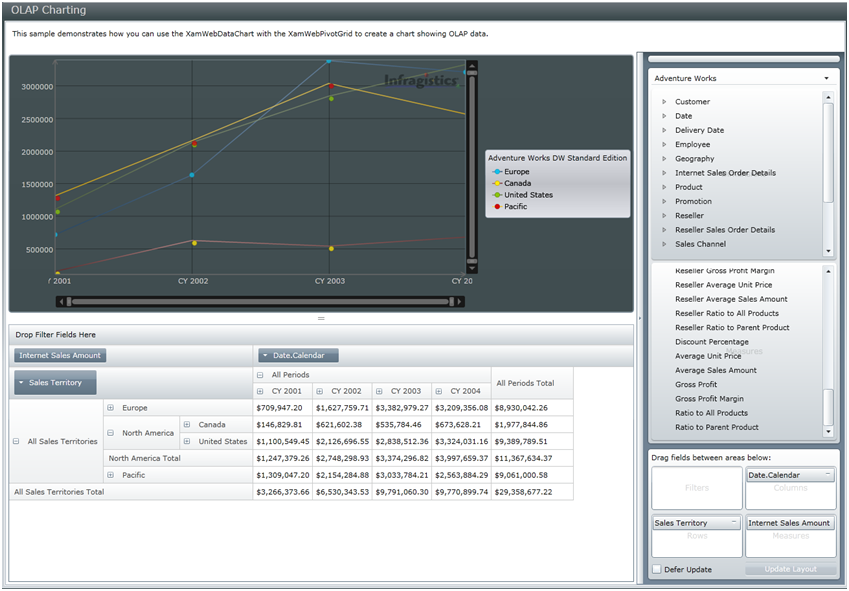
Don Demsak pointed out another Silverlight-based control from Infragistics, which is currently in a CTP phase. There are actually two controls: XamWebDataChart and XamWebPivotGrid. I played a bit with it and it looks great. I liked the Excel-like paradigm with the metadata pane on the right and the PivotChart and PivotTable synchronized. As I’ve been saying – give me a Silverlight-based Excel Pivot and I am happy.

120909_2209_Infragistic1

See my previous blog about the Intelligencia for Silverlight which is another Siliverlight-based control for Analysis Services.

Analysis Services Top 10 Wish List

Analysis Services leads the OLAP server market and it should be your platform of choice for historical and trend reporting. In the spirit of the season, here is my Top 10 Wish List for Analysis Services. All items are related to regular cubes and none to PowerPivot which I am yet to try.

  1. Improved client support – No 1 on my list has nothing to do with the server itself but with how well the Microsoft-provided clients support Analysis Services. To its credit, Microsoft continues improving the Excel OLAP support but still there are major functionality gaps from one tool to another. This is especially evident in the area of Reporting Services (see my No 1 SSRS wish list item). I am not sure if that’s possible from a technical standpoint but I wish the SSAS team re-factors the query generation logic into a MDX Query Generator binary of some kind which all tools can share to produce the same results consistently.
  2. Focus on UDM (aka Corporate BI) – Although I see some useful scenarios for self-serviced OLAP with PowerPivot (previously known as Gemini), for various reasons I believe the focus should stay on UDM which now Microsoft refers to as Corporate BI. First, the business problems that I solve with UDM exceed by far Gemini’s capabilities. Second, if not a single source for reporting and a single version of the truth, I believe UDM should handle 80-90% of the reporting needs. Finally, based on my experience, data acquisition is the most difficult thing. This is why we have a dimensional model which IT would put together. But once data is cleaned and transformed, building UDM on top of it shouldn’t take that long
  3. Silverlight OLAP Viewer control – A Silverlight-based control that ships with Visual Studio to let developers embed an Excel-like Analysis Services browser into their ASP.NET applications.
  4. Improved performance – Version 2008 has brought significant performance enhancement and SSAS performs great when aggregating regular measures. Usually, it is the calculations that will get you in trouble. So, anything that can be done to improve the server performance further will be welcome. For instance, the calculation engine executes the query on a single thread. It will be nice if a more complicated query can be parsed and executed in parallel.
  5. MDX Query Analyzer – Related to performance, it will be great if we finally get a graphical query analyzer (a-la the T-SQL query analyzer) with hints about how to improve the query execution.
  6. Memory-bound partitions – Again related to performance, it will be great if you could configure a partition to be memory-bound for super-fast access, as I mentioned in this blog.
  7. Detail reporting – I wish Analysis Services improves the ability to report on detail level. For example, it will nice to support text measures that the server returns for the lowest grain. I also want detail queries, such as a query that returns accounts for given customer to perform faster and don’t give up with “The expression contains a function that cannot operate on a set with more than 4,294,967,296 tuples.” error.
  8. Resource governor – Analysis Services should expand on letting the administrator manage resources, such as memory, connections, query timeouts, etc.
  9. Custom security – Support custom authentication that is not Windows-based to facilitate Internet connectivity perhaps similar to custom security in Reporting Services.
  10. Modeling enhancements – OK, this is a catch-all bucket for support issues that I logged and which were declared as “by design” and “future enhancements” [:D], such as aggregatable Many-to-Many relationships, fixing subselect issues, fixing exclusion filter with custom operator issue.

Happy holidays!

Reporting Services Top 10 Wish List

Reporting Services has gone a long way for the past five years and it’s getting better. In the spirit of the season, here is my Reporting Services Top 10 Wish List revised from three years ago. This list is based on my work, so your priorities may differ.

  1. Improved Analysis Services integration – Since its debut in SSRS 2005, the MDX query designer hasn’t changed. R2 continues the trend, so no hope until at least 2011, that’s six years! Yet, the MDX query designer has plenty of deficiencies and bugs to be addressed, such query schema limitations, poor support for parent-child hierarchies, parameter limitations, and so on. I use SSAS heavily in my real-life projects and have to battle these deficiencies on a daily basis. I think it’s time for Microsoft to poll customers and MVPs for feedback and improve the integration with SSAS.
  2. Eventing model – Although SSRS 2008 introduced a Report Definition Customization Extension (RDCE) that lets you change the report definition when the report requested, this extensibility mechanism was added as an afterthought and it’s somewhat kludgy. What’s really needed is server-side events, such as OnReportRender, OnPrint, OnParameterLoad, etc., similar to the ASP.NET programming model. Imagine the flexibility you will have as a report author if the server raises events for various stages of report processing and passes the report definition to let you evaluate conditions and change collections and RDL on the fly.
  3. Supported RDL Object Model – After promising an RDL object model at TechEd 2007, SSRS 2008 brought an unsupported version but R2 is on its way to “undo” it by making it publicly inaccessible. At the same time, there are many requirements that call for pre-processing report definitions. A supported RDL object model will definitely simplify this.
  4. Silverlight-based Report Viewer – Silverlight established itself as a platform of choice for web-based development. A Sliverlight Report Viewer will be a welcome addition.
  5. More interactive reporting – Currently, SSRS requires you to make design changes and preview them. It will be great if a future release blurs design and preview to support more interactive reporting similar to Excel PivotTable.
  6. Dataset enhancements, such as ability to navigate dataset rows and joining datasets at report level.
  7. More user-friendly ad-hoc reporting – Report Builder 2.0/3.0 is one my favorite features that SSRS 2008/R2 brought in. However, some end-user oriented features from Report Builder 1.0 got “lost” along the way. This item is about these features, such as making it easier for the end user to filter report data. When connected to SSAS, for example, SSRS should be as user-friendly as Excel.
  8. ADO.NET dataset binding for server reports – I keep on asking for this feature and I still think it could be very useful to be able to pass ADO.NET datasets to published reports without having to build a custom dataset extension.
  9. Report styling – Ability to style and skin reports.
  10. Decoupling the Report Builder Designer and exposing it as a reusable .NET control which can be embedded in applications.


Happy holidays!

Microsoft Live Labs Pivot

In case you’ve missed this, the Pivot era has begun. After Excel PivotTable and PivotChart, we’ll have PowerPivot in SQL Server 2008 R2. But Pivot evolves… A co-worker showed me today a glimpse of the Pivot future which I guess is the Microsoft Live Labs Pivot. Since grids and charts are not cool anymore we now have pictures and animation. It’s hard for me to understand at this point how this would apply to Business Intelligence but the Silverlight app with all these pictures sure looks catchy.

Long live Pivot!

Expert Cube Development with Analysis Services 2008

120209_1358_ExpertCubeD1Now that I’ve got my copy and read it, I can say a few things about the book Expert Cube Development with Microsoft SQL Server 2008 Analysis Services by Chris Webb, Alberto Ferrari, and Marco Russo. As mentioned in another post, the authors (all MVPs and prominent SSAS experts) don’t disappoint and you won’t go wrong picking up this book. The book is somewhat small in size (330 pages) but big in wisdom and best practices. It also includes plenty of references to external resources and blogs that the authors and other SSAS experts have written when you need further understanding of the topics discussed. Make no mistake though, this is not a step-by-step book and it doesn’t target novice users. As its title suggests, the book is geared toward more advanced users who have a few years of SSAS experience under their belt and are thirsty for more insightful knowledge.
 

Chapter 1 Designing the Data Warehouse for Analysis Services

The first and most important step for implementing a successful Analysis Services solution has nothing to do with Analysis Services at all. Its success depends on a solid schema design on which you’ll build the cube so the book is right on target to hit this topic first. Chapter 1 discusses common schema modeling challenges and provides plenty of tips to tackle them. One grudge I have here is about the following sentence “Beware of the temptation to avoid building a data warehouse and data marts” which may leave the reader with the impression that a data mart is a must. In fact, call me lazy but the first thing that I’d explore when starting a new SSAS project is if it’s possible to avoid a separate database. While a classic OLAP solution in many cases will require a new database (whatever you call it a data warehouse or a data mart) and the whole ETL enchilada that this entails, you may need to build a cube on top of simpler schemas, such on top of a DSS (decision support system) schema. In this case, I would explore the option to “dimensionalize” the source schema with a layer of SQL views. As with everything else, the keep-it-simple principle works for me.

Chapter 2 Basic Dimensions and Cubes

This chapter discusses the groundwork required to set up the raw dimensional model. This includes working with data sources, data source views, cubes, and dimensions. My favorite part of this chapter was the attribute design and setting up attribute relations. This often overlooked aspect of SSAS development is crucial for achieving good performance and the book explains why.

Chapter 3 Designing More Complex Dimensions

Next, the book explains how to handle more complex dimension schemas and hierarchies. This includes parent-child, ragged, slowly-changing, referenced, fact, and junk dimensions. The authors’ real-life experience shows through. About junk dimensions, my preference is to avoid them wherever possible for performance reasons. Instead, I’d explore the option to keep the low-cardinality attributes in the fact table and use report or URL actions to view them. In my opinion, SSAS is not there yet as far as reporting on details.

Chapter 4 Measures and Measure Groups

The whole purpose of building a cube is to aggregate measures. Analysis Services supports various aggregation functions and the book provides essential coverage. You will learn how to implement semi-additive measures if you cannot afford the Enterprise Edition of SQL Server. Custom aggregation by using unary operators and custom member formulas are presented too. Then the book discusses more complex relationship types, including different grains, linked dimensions and measure groups, role-playing dimensions and fact relationships.

Chapter 5 Adding Transactional Data

Although most users would be interested in aggregated data, sometimes users may need to see the level of details behind a cell. The book explains how you can do this by using drillthrough and actions. Drillthrough options are covered in great details. Excellent coverage is provided for many-to-many relationships as well.

Chapter 6 Adding Calculations to the Cube

Cubes usually include business calculations in the form of MDX expressions. Chapter 6 gives lays the foundation for using MDX. It provides practical examples for calculated members, including YTD, ratios, growths, same period last previous year, moving averages, and ranks. Handling relative dates is a common business requirement. For example, I personally had to implement two custom types of relative dates as explained in this blog. The book provides a great example for implementing a custom calculation dimension for implementing more flexible relative dates that the BI Wizard provides. Finally, the chapter discusses static and dynamic named sets.

Chapter 7 Adding Currency Conversion

I consider myself lucky for never having to support international users because of the complexities surrounding the issue. If you have to, SSAS gives you the necessary features to tackle various localization requirements. This chapter walks you through the details of implementing currency conversion using the BI wizard, measure expressions, and writeback. My advice is to avoid writeback due to its limitations. Instead, consider an URL action that navigates the user to a custom web page for handing data changes and proactive caching for automatically updating the cube.

Chapter 8 Query Performance Tuning

SSAS bends backwards to provide great performance. You can help by following best practices for cube design. This chapter teaches you how to implement partitions and aggregations. I like the sections for monitoring partition and aggregation usage and building aggregations manually. The chapter presents useful tips to diagnose and resolve performance issues, such as by using the MDX Studio, named sets, calculated members, and caching.

Chapter 9 Securing the Cube

Chances are you will need to provide restricted access to the cube for groups of users. This chapter shows you how to implement and test roles. It covers cell and dimension security. It presents solutions for implementing custom dimension data security which are similar to the ones I discussed in this article.

Chapter 9 Productionization

Your SSAS solution is ready and it’s time to see daylight. This chapter covers the tasks associated with deploying and managing your SSAS solution in production environment. These include managing and generating partitions and processing. I liked the coverage of different processing options.

Chapter 10 Monitoring Cube Performance and Usage

As an administrator, your job doesn’t end once the solution is deployed. You need to monitor it on a daily basis to ensure that it performs optimally. The last chapter explains different server monitoring techniques, such as performance counters, tracing, Resource Monitor, SQL Profiler, and using Dynamic Management Views (DMVs). I personally liked the memory management tips.

In summary, I highly recommend this book to anyone who has several years of experience in SSAS development and need a compass check to make sure that he follows the right track. Kudos to the authors for taking time to write it!


SharePoint List Data Extension

R2 brings several SharePoint enhancements, including:

  • Support for multiple SharePoint zones – Previously, SSRS supported access from SharePoint URLs in the default zone, as I explained before.
  • Support for the SharePoint Universal Logging service – Reporting Services introduced a new server interface called IRSSetUserToken. When this interface is implemented, the report server calls the UserToken Set property on this interface and passes the SharePoint user token to the data extension.
  • Scripting with the rs utility – The rs utility now supports servers configured in SharePoint integrated mode. This lets you create scripts that automate management tasks that target report servers in SharePoint mode.
  • New SharePoint List Data Extension – Lets you report from SharePoint lists

The last on the list, the new SharePoint List data extension, probably picked up your interest and deserves more explanation. Previously, if you had to use the XML Data Provider to call the SharePoint web service if you wanted to report off SharePoint lists. The new extension simplifies this by supporting SharePoint lists natively. But before you get too excited about it, I have to dampen your enthusiasm by mentioning two limitations:

  1. The extension supports querying a single list only.
  2. It doesn’t support folders if the list organizes items in folders.

The SharePoint List data extension is supported with both modes – native and SharePoint integrated. It supports Windows SharePoint Services 3.0 and 2010, as well as MOSS. Next, I’ll demonstrate the SharePoint List extension by setting up a dataset that retrieves items from the Issues list of a SharePoint site. The SharePoint list extension is available both in the BIDS Report Designer and Report Builder 3.0. For the purposes of this demo, I’ll use the BIDS Report Designer.

Configuring the data source

Start by setting up the data source as you would normally do when you author a report.

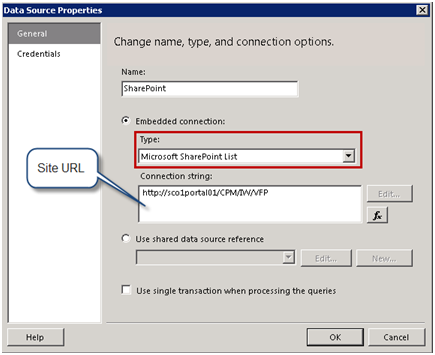
  1. Set up a data source that uses the Microsoft SharePoint List provider.
  2. In the Connection String field, enter the URL of the SharePoint site that has the list you want to query.
  3. Switch to the Credentials tab and select the Use Windows Authentication option. Click OK to close the Data Source Properties dialog.

112409_1416_SharePointL1

Configuring the dataset

Once the data source is in place, the next steps will be to set up a dataset. The SharePoint List data extension supports a graphical query designer that lets you select and filter a list.

  1. Add a new dataset that uses the data source you’ve just created. On the Dataset Properties, click the Query Designer button.

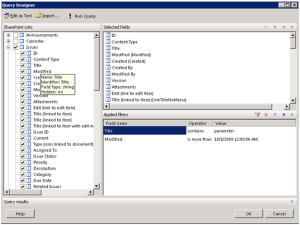
Report Designer loads the graphical query designer. The SharePoint Lists pane shows all lists in the library. You can check a list to get all fields of the list or select individual fields. You can hover on a field to see additional properties as tooltips, such as Name, Identifier, Field Type and Hidden properties.

You can also filter the list. In this case, the Issues list is associated with a My Issues view. Since I don’t have any issues assigned to me, I had to overwrite the list filter by supplying a non-empty query filter. For demo purposes, I decided to set up a filter where the Title column contains the word “parameter” and the Modified date is after 10/1/2009.

112409_1416_SharePointL2

  1. Click the Run Query button to execute the query and see the data and the OK button to close the Query Designer and generate the dataset.

In case you are curious what the actual query looks like, click the Edit As Text query button. If you want to get all fields, the query can omit the ViewFields element.

<RSSharePointList xmlns:xsi=”http://www.w3.org/2001/XMLSchema-instance” xmlns:xsd=”http://www.w3.org/2001/XMLSchema”>

<ListName>Issues</ListName>

<ViewFields>

<FieldRef Name=”ID” />

<FieldRef Name=”ContentType” />

. . .

</ViewFields>

<Query>

<Where>

<And>

<Contains>

<FieldRef Name=”Title” />

<Value Type=”Text”>parameter</Value>

</Contains>

<Gt>

<FieldRef Name=”Modified” />

<Value Type=”DateTime”>2009-10-01T00:00:00</Value>

</Gt>

</And>

</Where>

</Query>

</RSSharePointList>

The SharePoint List data extension is a new R2 feature that simplifies the process of authoring reports from SharePoint lists. Although it doesn’t support all features of third-party data extensions for SharePoint, it’s a welcome enhancement that lets you retrieve and filter items from a single SharePoint list.

Report Parts

The major new R2 feature that debuts in CTP 3 (November CTP) of SQL Server 2008 R2 Reporting Services is report parts. A report part is a fragment of a report definition that you can publish to the report server to facilitate best practices and reuse. Just like a developer can refactor and share some piece of code, the report author can re-factor a portion of a report and publish it to the server so that end users can use it as it-is. The following report items can be published as report parts:

  • Charts
  • Gauges
  • Images
  • Maps
  • Parameters
  • Rectangles
  • Tables
  • Matrices
  • Lists

A notable exception to this list is page headers and footers which are probably the most likely candidates for reuse but at this point they didn’t make the list. It’s important to note that if a data region uses a report-specific dataset (not a shared dataset), publishing the region as a report part will publish its dependent dataset. Report parts can best understood by example, so let’s walk through the workflow of publishing, using, and changing a report part.

Publishing report parts

You can use the BIDS Report Designer or Report Builder 3.0 to publish a report part. The following steps assume you use Report Designer. Let’s say I decided that the tablix with sparklines, which I discussed in a previous blog, is a darn good and it should be promoted as a published report part that other users could enjoy for educational or other purposes.

  1. Start by setting the server folder where report parts will be published on deploy. In the project properties, set the TargetReportPartFolder (a new deployment setting) to the name of the server folder, such as Report Parts, or a SharePoint library URL for SharePoint integrated mode.
  2. With the report open in design mode, expand the Report main menu and click Publish Report Parts. If you use Report Builder 3.0, click the Report Builder 3.0 button (the round button in the topmost left area) and select Publish Report Parts.
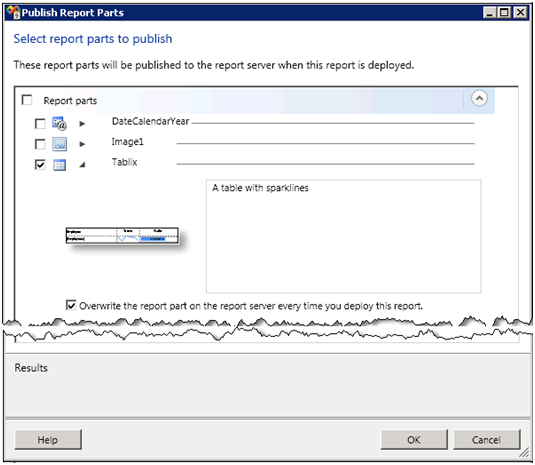
  3. The Publish Report Parts dialog box shows the items on the report that are supported as report parts. Check the Tablix report item.
  4. You can rename a report part by double-clicking its name and typing the new name in place. Click the arrow next to it to expand the Tablix section. Enter a description, such as “A table with sparklines” and click OK to close the dialog box.

112409_0139_ReportParts1

5.  So far, you have configured which items will be promoted to report parts but you haven’t actually published them. To do so, you need to publish the containing report. In Solution Explorer, right-click the report and click Publish.

At this point, you should see messages in the BIDS Output Window informing that the report and the report parts you defined are being published.

Deploying report part ‘Tablix’ to ‘/Report Parts’…

Deploying report parts complete — 1 succeeded, 0 failed, 0 skipped

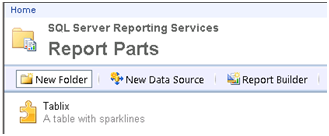
6.   Open Report Manager (or SharePoint) and navigate to the Report Parts folder. You should see the Tablix report part.

112409_0139_ReportParts2

If you go to its properties and download its definition, you will see that the file name has an *.rsc extension and that the report part is represented by a ComponentItem element in RDL. Notice also that the report part definition includes all datasets that report part uses. Once the report part is published, you can manage it just like you can manage a published report. For example, you can change its name, description, or security settings.

Using report parts

End users can consume published report parts. Notice that I said “end users” because more than likely this will be the most common scenario. In fact, the BIDS Report Designer doesn’t support referencing report parts, only publishing them. The Report Builder 3.0 has been extended to support this feature.

112409_0139_ReportParts3

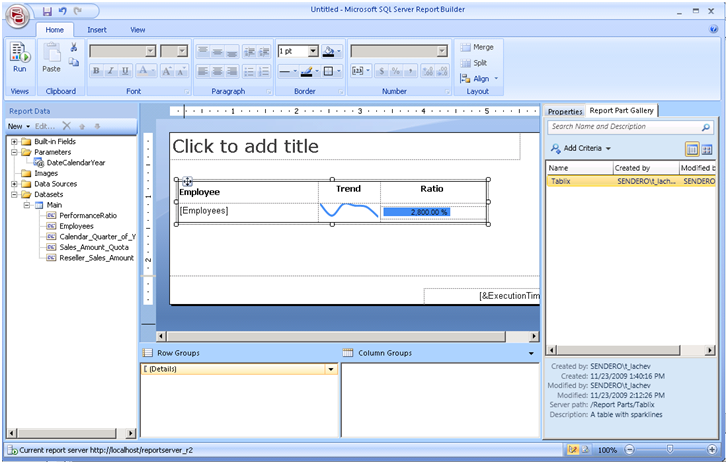
  1. Open Report Builder 3.0 and create a blank report.
  2. Click the Report Builder 3.0 button, click Options and verify that the report server URL is set.
  3. Click the Report Part Gallery tab of the Properties window. Click the Search button to show all report parts that you have access to.
  4. Select the Tablix report part and notice that Report Builder 3.0 shows its properties below.
  5. Drag the Tablix report part and drop it on the report canvas.

Report Builder 3.0 adds the tablix region, the dataset is bound to and report parameters. From here, the report part takes a life of its own. You can make changes to the report as needed including changes to the report part elements. The layout changes you make are not reflected to the published part. If you want to re-publish the changed report part, you can click the Report Builder button and click Publish Report Parts. This will prompt you if you want to re-publish with default settings or review and make changes which will bring you to the Publish Report Parts dialog box.

Changing report parts

The original report part author or another user which appropriate permissions can make changes and re-publish a report part. End users can check if a report part has changed and choose to accept or not the changes. To do this, they have to poll the server for updates. Currently, there is no way for the server to push the changes to all reports who consume the report part in order to force the changes.

112409_0139_ReportParts4

  1. In Report Designer or Report Builder 3.0, open the report that has the Tablix report part. Make changes to the tablix region and deploy the report to re-publish the report part.
  2. In Report Builder 3.0, open a report that uses that report part.
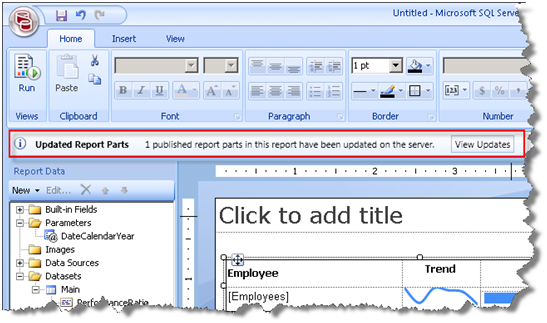
  3. Click the Report Builder 3.0 button and click Check for Updates. Notice that Report Builder 3.0 detects the changes and displays a message that it has found one changed part.
  4. Click the View Updates button to see what report parts have changed. In the Update Report Parts dialog box, select the Tablix report part and click the Update button to refresh it.

Report Builder 3.0 replaces the tablix region the published version. However, Report Builder 3.0 keeps the existing dataset and parameters, even if they are not changed, and appends new datasets and parameters each time the part is refreshed. So, if you have a dataset called Main, refreshing a part will add a new dataset called Main2 and bind the refreshed part to Main2.

Report parts are a new feature of SSRS R2. They promote consistency and reuse by letting you re-factor sections of a report and make them available for public consumption.