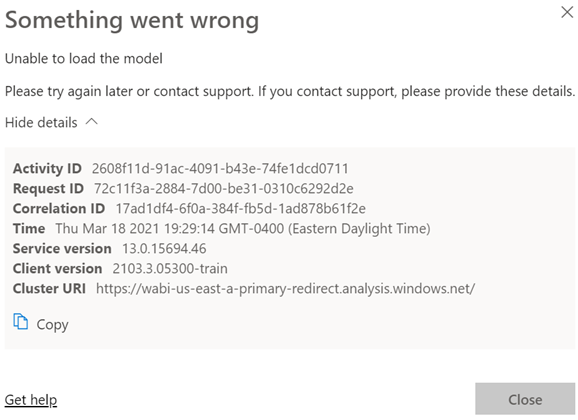
Scenario: You deploy a model to a Power BI workspace. You assign users to Members and Viewers roles. Everyone is happy. You later added a row-level security role and republish the model. Admins, Contributors and Members continue to view reports connected to the dataset as usual. However, Viewers report an error like the one shown below (didn’t Microsoft do an outstanding job explaining what went wrong with all of these guids?):
Analysis: Users with Administrator, Member, and Contributor permissions bypass any row-level security policies even if they assigned as role members. However, viewers are refused access unless they are added to a role that grants them the appropriate permissions. So, the likely culprit here is that there are some viewers that are not assigned to a role.
If viewers should have unrestricted access to an RLS-enabled dataset, create an Open Access role and add them to the role. As a best practice, you should create a security group and grant the group membership to the workspace and RLS.
https://prologika.com/wp-content/uploads/2016/01/logo.png00Prologika - Teo Lachevhttps://prologika.com/wp-content/uploads/2016/01/logo.pngPrologika - Teo Lachev2021-03-18 21:01:042021-05-20 17:16:46When Something Goes Wrong (Unable to Load the Model)
UPDATE 11/26/2020: After the latest update to tenant settings, I’m glad that the new “Export to …” settings don’t affect external connections anymore. There is now a new setting “Allow live connections” to control external connectivity. Read “Updated Export Settings” to learn more.
The Power BI “Export data” setting is horrible. I wish Microsoft never came up with it and no other Microsoft tool has it. Apparently, the premise here is to prevent users from exporting data behind the report so it does not end up in wrong hands. But all it accomplishes is a false sense of data security and does more damage than good. Like users can’t take screenshots and share them wherever they please. Or print and mail reports. Unless of course, you disable printing reports too, but where is that path of not trusting your users going? Why don’t you just disallow them from viewing reports at all? “No data, no problem”, right?
Besides “exporting” data, this setting effectively disables all external connections to published datasets. Therefore, the following Power BI features won’t work:
Creating reports from published datasets, which is a best practice.
Publishing semantic models from Visual Studio via the Power BI Premium XMLA endpoint. Even if you enable the XMLA endpoint for read/write, “Export data” will overwrite it because it’s highest level overwrite
Connecting other tools to published datasets, such as SSMS, Tabular Editor, DAX Studio, Profiler, and third-party reporting tools.
Using the “Analyze in Excel” feature for creating Excel reports connected to published datasets.
So, leave “Export data” enabled. If you really want to prevent sensitive data outside your organization, consider applying sensitivity labels which integrate with Office 365 information protection.
https://prologika.com/wp-content/uploads/2016/01/logo.png00Prologika - Teo Lachevhttps://prologika.com/wp-content/uploads/2016/01/logo.pngPrologika - Teo Lachev2020-06-30 17:43:452020-11-26 14:31:31A False Sense of Data Security
Every now and then I get a question about how to secure Power BI report pages. A business analyst has created a multi-page report that requires limited access to some sensitive information in one or more report pages. I always cringe at this idea and recommend securing the data instead. That’s because report-level or dashboard-level security can be easily compromised. For example, if the user has permissions to use Analyze in Excel, they will surely bypass report security and get access to all the data. The same will happen if they use Report Builder or connect a third-party tool to the published Power BI dataset. Instead, you should apply row-level security (RLS) to protect the data. Currently, Power BI doesn’t let you secure report pages but if you must apply report or visual security, you have options:
Break the report into two set of reports: one with open access and another with “secure” pages. Share the report with the secure pages with the people who can access it or publish it to a separate workspace.
Add a hidden page-level or report-level slicer that filters on a DAX measure. The DAX measure can check the user identity using the USERPRINCIPALNAME() function, so the slicer doesn’t return any values if the interactive user is not authorized. Granted, a better (and preferred) way to achieve this could be to apply RLS but RLS will restrict data to all visuals where as a slicer can filter only selected visuals.
https://prologika.com/wp-content/uploads/2016/01/logo.png00Prologika - Teo Lachevhttps://prologika.com/wp-content/uploads/2016/01/logo.pngPrologika - Teo Lachev2019-10-27 17:54:212019-10-29 17:05:25Securing Power BI Report Pages
Power BI lets you share content directly with external users for B2B and B2C scenarios. When the benefits of this sharing option outweigh its limitations (read-only reports, requiring Azure AD federated access, per-user licensing, rendering the report inside Power BI), this is the easiest way to share Power BI content with an external party. However, the documentation, which is otherwise excellent, doesn’t explain the steps required to allow the external user to see only a subset of data when you have a dataset configured for data (RLS) security.
Granting access to an external user to a dataset configured for data security is like the proverbial chicken and egg problem. To grant access to the report, you need to share the report with the user, but you can’t add the user to the security role because the user is not provisioned yet. Hence, you’ll first share a non-sensitive report with the user before you share the actual report.
Create an organizational workspace. I recommend you create a v2 workspace for the benefits I outlined in my “Power BI Sharing Is Getting Better” blog.
In Power BI Desktop, import some sample data that is OK for the end user to see. Create a simple report for testing. A dataset is required because for some obscure reason, Power BI will prevent you from sharing an empty report that doesn’t have a dataset. Publish the Power BI Desktop file to powerbi.com.
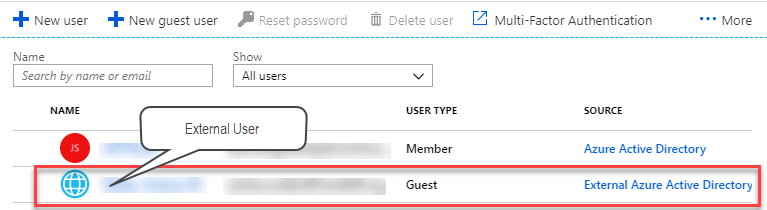
Share the non-sensitive report with the external user. At this point, if you examine the user account in Azure Active Directory in the Azure Portal (portal.azure.com), it will show that the user is invited.
When the user gets the email, clicks the link, and navigates the prompts, the user will be eventually added to your tenant’s Active Directory and will show as Guest in the External Azure Active Directory source.
Now you can assign a Power BI Pro license to this user in the Azure Portal. Remember that unless you are on Power BI Premium, any form of sharing requires a Power BI Pro license. One gotcha here is that the Azure Portal might refuse assigning a Power BI Pro license with the following error “License cannot be assigned to a user without a usage location specified.” To fix this horrible issue, go to Azure Active Directory (Users tab), click the external user, click Edit in the Settings section in the user profile, and then use the “Usage location” drop-down to select the country where the user is located.
At this point, the external user is added to your tenant’s active directory and covered by Power BI Pro license. Next, publish the actual Power BI Desktop file with the sensitive report you want to share. This file should have a role that applies a row filter to one or more tables to enforce data security in a multi-tenant dataset. Once the file is published to powerbi.com, go to the dataset Security setting and add the external user to the role by typing the user’s email.
The last step is to share the report with the external user.
TIP: If you have a lot of external users, consider assigning them to a security group so you can grant access to the group instead of individual emails. Also, instead of sharing individual reports and dashboards, use Apps to grant access to the security groups. Note that as I explained in the “Power BI Sharing Is Getting Better” blog, currently you can’t assign viewers as members of the workspace. You must use either dashboard/report sharing or apps.
https://prologika.com/wp-content/uploads/2016/01/logo.png00Prologika - Teo Lachevhttps://prologika.com/wp-content/uploads/2016/01/logo.pngPrologika - Teo Lachev2018-12-28 15:59:532018-12-28 15:59:53Power BI External Users and Data Security
As promised at the Microsoft Data Insight Summit last month, Power BI row-level security for published Power BI Desktop files (aka as cloud models) is now in preview. This means that soon you’ll be able to restrict the data that the user is authorized to see based on the user identity. If you have experience in Power Pivot, you’d probably recall that Power Pivot doesn’t support row-level security. If the user gains access to the model, the user can see all the data. Row-level security requirements for Power Pivot would necessitate migrating to Tabular. This is still a limitation for Excel Power Pivot models. However, if you use Power BI Desktop and publish the file to Power BI, you can now create roles that use rules (similar to DAX filters). Row-level security is well documented here.
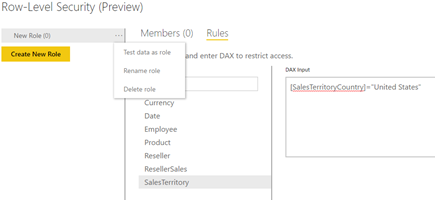
From an implementation standpoint, Microsoft has decided to externalize row-level security in Power BI. At least for now, instead of defining security inside the PBIX file, you define roles in powerbi.com and associate them with a dataset. To do so, you simply click the ellipsis (…) button next to the dataset (it must be created by publishing a pbix file) and then click Security. You create a new role, assign users, and define rules using the same syntax as DAX row filters when creating Tabular roles. The RLS preview doesn’t seem to check currently for grammar errors. It takes any text so be sure to use correct DAX syntax.
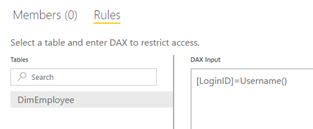
To test the role, click the ellipsis (…) next to the role and click “Test data as role”. This action opens the report that is associated with the dataset. If you see nothing on the report, more than likely the rule syntax is incorrect or the rule has no match. Notice that you can also implement dynamic data security by using the DAX Username() function. For example, if the Employee dataset includes a LoginID column that stores the user principle name (UPN), the following rule would apply a filter on the Employee table to return only the employee who’s logged in to powerbi.com and running the report. UPN typically corresponds to the user email address. This is important to know because unlike Tabular where Username would return domain\user, here it returns the email address so make sure your filtered column stores UPNs.
As a preview feature, RLS has a few significant limitations that I expect to be removed when it becomes GA. For now, use it for testing and learning purposes only. As the documentation states:
Note: The preview is intended to let users to start trying out the feature. It will also allow us to collect feedback for improvements. It is not intended for operational usage. Rules defined during the preview may not be available when the feature is generally available.
The most important limitations are:
Republishing the dataset removes the role definitions. Not only is this annoying but it might also present security vulnerability during the period when you need to recreate the rules (users will see all the data).
RLS doesn’t support group workspaces. It’s not very useful to apply RLS to your private data unless you share dashboards with someone else.
When I did my first test a few days ago, Username would return a GUID which apparently is fixed now (Power BI moves fast!).
You cannot add security groups or distribution lists to the member list. As a best practice to simplify maintenance, instead of adding individual users, you should assign groups.
https://prologika.com/wp-content/uploads/2016/01/logo.png00Prologika - Teo Lachevhttps://prologika.com/wp-content/uploads/2016/01/logo.pngPrologika - Teo Lachev2016-05-01 17:39:072016-05-01 17:43:54Power BI Row-level Security in Preview