What’s New in Office 2013 BI: Part 1 – Personal BI with Excel
As you probably know by now, Microsoft unveiled the Office 2013 Technology Preview. As the portal page says, “we’ve Taken Self-Service BI to the Next Level”. Indeed, this is where I believe we’ll see Office 2013 emerging as a leading tool on the market for self-service BI. Based on my experience, business users love Excel 2010 with PowerPivot because of its familiar environment and ease of use. However, the Excel visualization capabilities have been lacking. As familiar as they are, pivot table reports are getting somewhat outdated. This is why I put enhanced visualization options on my wish list. This all changes in Office 2013 where the question won’t be “Why we don’t have modern visualization options?” but “Which visualization option should I use?”

Microsoft decoupled Power View from SharePoint and added it to Excel to allow business users to create ad-hoc Power View reports that source data from the personal models that they create in Excel. Speaking of personal models, xVelocity (previously known as VertiPaq) integrates now natively in Excel to power any PivotTable and PivotChart report. Fellow MVPs have already covered some of the new BI features. Check Chris Webb’s Building a Simple BI Solution in Excel 2013 blog series and Thomas Ivarsson’s Power View in Excel 2013 blog series. In this blog, I’ll show you the Excel native integration with xVelocity and explain why you still need PowerPivot. Now that MSDN subscribers can set up a free VM on Windows Azure, I stood up a Virtual Machine that has SQL Server 2012 and Office 13. I plan to add SharePoint 2013 later on. A great solution for my demos!
Suppose you are a business analyst with Adventure Works and you’re tasked to analyze reseller sales data that is kept in the company’s data warehouse.
- Unlike Excel 2010, you don’t have to go to the PowerPivot Window to start the import process. Instead, you can use the Excel native import capabilities. Click on Data From Other Data Sources From SQL Server. Then, specify the server name and database.

- In the Select Database and Table step, check the “Enable selection of multiple tables” checkbox so we can import multiple tables in one shot. Enabling importing of multiple tables would automatically put the data into the xVelocity store as Excel doesn’t natively support joining tables. Then, check FactResellerSales and click the Select Related Tables button to select all tables that are directly related to FactResellerSales if there are referential integrity constraints defined in the database.
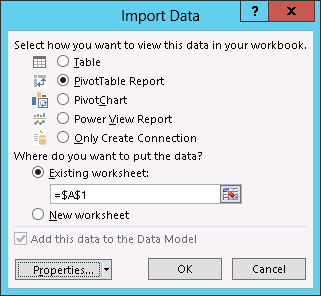
- In the Save Data Connection File and Finish step, enter the name of the file name and a friendly name of the connection and click Finish. The Import Data dialog box deserves more attention.

If you chose the first option, Excel will add new sheets with data, each corresponding to a database table. However, if you chose the other options, the data will be imported into the model but no sheets will be added to the workbook. This will be useful if you want to import a table with more than a million rows because Excel still has the limitation of having one million rows per sheet. As with the previous releases, the 64-bit of Excel is preferable if you want to pack lots of data in the xVelocity engine because it can access all the memory as opposed to 2 GB only.
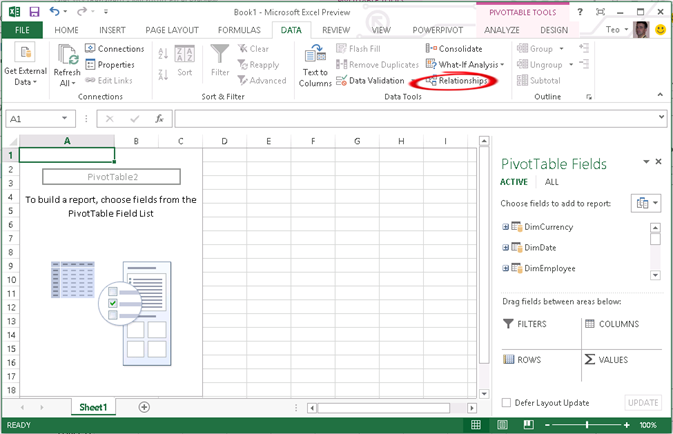
Next, Excel imports the data and adds tables into the internal model, and then shows the tables in the field list (notice that the Excel field list supersedes the PowerPivot Field list). Also, notice that you can click the Relationship button to manage the table relationships as you can do now with PowerPivot for Excel. As you can see, some of the PowerPivot features moved to Excel. From the PivotTable field list ALL tab you can see any other table that exists in the workbook and use them in the pivot.
So, what about PowerPivot for Excel? The add-in is still there but not enabled by default. To enable it, click File ð Options, then click the Add-Ins tab. In the Manage drop-down, select COM Add-ins, and then check the Microsoft Office PowerPivot for Office 2013 add-in. This adds the PowerPivot menu to the Excel ribbon. From the PowerPivot menu, you can click the Manage button to launch the familiar PowerPivot for Excel window. No new PowerPivot features are added to Office 2013.
What can you do with PowerPivot that you can’t do with Excel 15? Here are some reasons to use the add-in:
- Add calculated columns to tables in the model
- Add calculated measures
- Change the metadata, e.g. rename tables and columns, format columns, change column data types
- Hide tables and columns so they will not show in the field list
- Use the diagram view to visualize the schema, manage relationships, create hierarchies
- Using the PowerPivot advanced features, such as perspectives and Power View reporting features


