Partition Generator for Multidimensional Cubes
Today happens to be my birthday. To reverse the tradition, how about I give you a gift? If you find yourself spending hours creating partitions in BIDS, you might find the Partition Generator sample (requires registration at the Prologika website) useful. Often, I partition larger cubes by month which may require creating quite a few partitions. Not only is this time-consuming and tedious, but is also error-prone as you can easily get the partition slice query wrong. Written as a C# console application, Partition Generator has the following design goals:
- Keep it simple on purpose and due to time constraints. So, no GUI yet and you need to have basic .NET coding skills. You will need Visual Studio 2008 or later with C# to configure it.
- Auto-generate a partition definition file in an offline mode without making changes to the server by default. You can use this file to replace the *.partitions file in BIDS so the partitioning scheme can become a part of your project.
- Support an online mode where you can deploy the partition changes to the server.
Configuring Partition Generator
Configuring partition generator requires opening the source and making changes to reflect your environment. Specifically, you need to update the following variables:
static string _server = “<your server>”; // SSAS server where the cube is deployed
static string _database = “<database>”; // SSAS datasbase
static string _cube = “<cube>”; // SSAS cube to partition
static string _measureGroup = “<measure group>”; // Measure group to partition
static string _dataSource = “<data source name>”; // The data source name
static DateTime _dateStart = new DateTime(2007, 1, 1); // start date for the period
static DateTime _dateEnd = new DateTime(2020, 12, 31); // end date for the period
// the partition query
static string _query = “SELECT * FROM [dbo].[FactInternetSales] WHERE OrderDateKey “;
Note that you need a live cube to connect to which can be partitioned or not partitioned (default partition only). The start date and end date variables specify the start date for the first partition and end date for the last partition respectively. By default, Partition Generator will partition by month but you can overwrite this in code by changing the following line:
_dateStart = _dateStart.AddMonths(1); // assuming parititon by month
Partition Manager creates also start and end partitions for dates outside the date range which could be handy if you forget to add partitions after the end date is passed. Partition Generator sets also the partition slice which is a recommended performance-optimization technique.
Updating the Project
Once you configure Partition Generator, run it with Ctrl+F5. It uses AMO to retrieve the cube metadata and generates a partitions.xmla file in the project bin\debug folder.
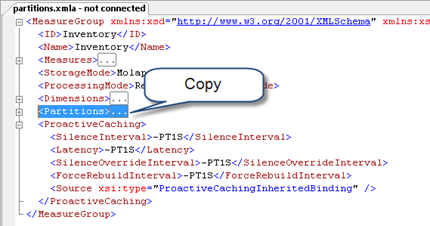
- Double-click the partitions.xmla to open it in SQL Server Management Studio.
-
Find and collapse the Partitions XML element. Select the Partitions element and press Ctrl+C to copy its content.

- Back up your SSAS project. Open your SSAS project in BIDS. In Solution Explorer, click Show All Files.
- Expand the Cubes folder, right-click the <cube name>.partitions file and click View Code to open its source.
- Find and select the entire Partitions element for the measure group you want to partition, and press Ctrl+V to replace the source with new partition schema which you copied in SSMS.
- Save the project and close BIDS. That’s because BIDS doesn’t handle well changes made directly to the source files.
- Open the SSAS project again in BIDS. Open your cube in the Cube Designer and click the Partitions tab. You should see the new partitions.
Deploying Partitions
By default, Partition Generator doesn’t change the deployed cube. It reads metadata only. However, you can be configured to deploy the partition changes. This could be useful when you want to experiment with different partitioning schemes, such as by month, quarter, year, etc. To configure Partition Manager to deploy the changes:
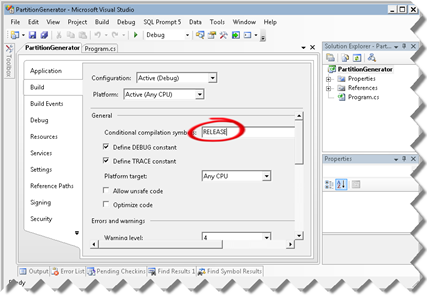
- In the PartitionGenerator project, right-click the PartitionGenerator project node in Solution Explorer and click Properties.
-
In the Project Properties dialog box, select the Build tab and define a RELEASE conditional compilation symbol as follows:
- Run Partition Manager to generate both the partitions.xmla file and apply the changes to the SSAS server.
I haven’t tested Partition Manager with BISM Tabular. It should work since Tabular uses the same Partition element in the model (*.bim) file. One more thing – Partition Manager is not supported so please use it at your own risk.
Enjoy!


