Power BI Sharing Got a Bit Better

One Power BI aspect that I’m not crazy about is sharing. It’s my experience that most organization could benefit from a simplified sharing where users or groups are added to a workspace with different roles and permissions, such as Content Manager, Browser, Administrator. This could have worked conceptually like SSRS security. At some point, we could have nested workspaces and custom roles, such as a role that gives viewers permissions to rearrange tiles.

Alas, Power BI doesn’t support this security model. Instead, it supports dashboard sharing and apps. This can be confusing. For instance, if you have Power BI Premium, you might be tempted to add Power BI Free users to a workspace after you’ve heard that Power BI Premium lets you share content with free users. Unfortunately, adding Power BI Free users to a workspace accomplishes nothing and they will quickly discover this fact when they attempt to access the workspace content and get prompted to upgrade to Power BI Pro (workspaces are a Power BI Pro feature). Instead, you must share with free users using dashboard sharing or apps and both options have pros and cons. Another issue is that any Power BI user who is a member of the workspace can create apps, which can surely lead to chaos.

On the upside, apps shield users from content changes. You can change content in a workspace, but app recipients don’t see the changes unless you republish the app. In time, Microsoft might add features to apps to make them a more compelling choice for sharing.

For example, recently Microsoft added an “Included in App” toggle to reports and dashboards to let you exclude content from an app. Previously, publishing an app would publish all the content in a workspace, which presented another issue because not all workspace content could be suitable for sharing.

012118_0043_PowerBIShar1.png

Q&A in Power BI Desktop

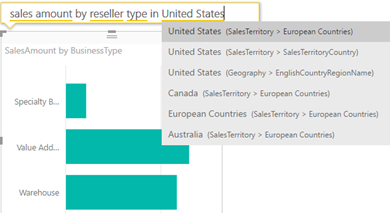
Natural queries (aka Q&A) has been a prominent feature since Power BI Service existed. Wouldn’t be nice to do the same in the Power BI Desktop? You can, but make sure to enable first Q&A from File, Options and Settings, Options (“Preview features”) tab because it’s currently a preview feature. Once you do this and restart Power BI Desktop, you should see “Ask A Question” button in the Home ribbon.

Sometimes the fastest way to get an answer from your data is to ask a question using natural language. For example, “what were total sales last year.” Use Power BI Q&A on the cloud or desktop to explore your data using intuitive, natural language capabilities and receive answers in the form of charts and graphs.

As of this time, Q&A requires data to be imported. It doesn’t work with DirectQuery connections. There are two ways to activate Q&A in Power BI Desktop:

  1. Double-click an empty space anywhere on a page.
  2. Click the “Ask A Question” button in the Home ribbon’s tab.

This adds an empty “Stacked Column Chart” visual and a Q&A area above it that prompts you to ask a question about your data. On the desktop, Q&A works the same way as in Power BI Service. As you type in your question, it guides you through the metadata fields and visualizes the data.

011318_1925_QAinPowerBI1.png

Once you’re done with the question, you can use the visual just like any other visuals. Unlike Power BI Service, once you deactivate the visual, such by clicking somewhere else on the page, the Q&A box disappears, and you can’t bring it back to see what question was asked.

SSRS Multivalue Parameters in DAX

UPDATE: Microsoft has added support for multi-valued parameters in the DAX Query Designer. Please read the discussion thread below for more info. You can use the approach discussed in this article if you need more control over the parameter handling, but the Microsoft-provided way should suffice for most cases and it’s easier to implement.

Déjà vu today with a twist. SSRS multivalue parameters in SSAS reports but this time in DAX. Now that SSAS Designer supports DAX queries, we should be able to do everything we were able to do in MDX, right? Unfortunately, as you will quickly discover, Microsoft “forgot” about multivalue parameters when working on the DAX Designer.

You can use MDX (no shame there) and write queries the old way, but if you are a DAX purist, you’d need to take the road less traveled which goes through the DAX rabbit hole.

Here are the high-level steps in the SSDT Report Designer/Report Builder and I tried my best to simplify this as much as I can:

  1. Do as much drag and drop using the DAX Graphical Query Designer to auto-generate the DAX query, as you won’t have another chance once you switch to a text mode. You can also use the graphical mode to declare your parameter(s) and to let SSRS autogenerate the report-level parameters and queries.
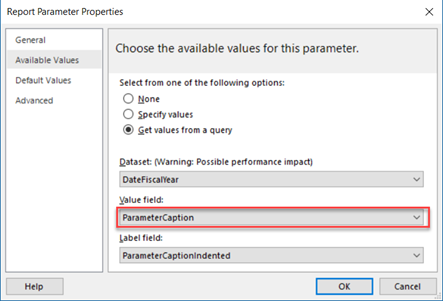
  2. If you let the DAX Query Designer auto-generate the parameter queries, change the Available Values of the report-level parameters to use ParameterCaption field (not the ParameterValue column). If the parameter uses default values, change the Default Values tab to set the default values by captions (not using pipe-delimited format that the DAX Designer auto-generates). Again, that’s because we’d use the parameter caption.
    011218_0216_SSRSMultiva1.png
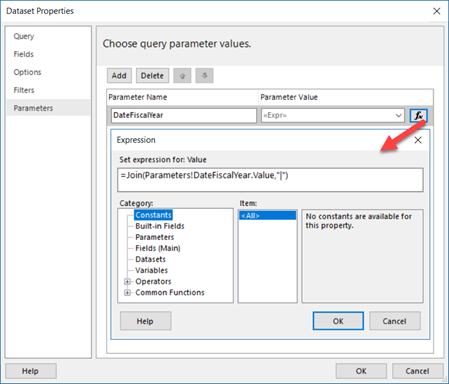
  3. Go to the properties of the main dataset, flip to the Parameters tab and change the expression to concatenate the parameter values with a pipe “|”, such as =Join(Parameters!DateFiscalYear.Value,”|”). You’ll see why in a moment.
    011218_0216_SSRSMultiva2.png
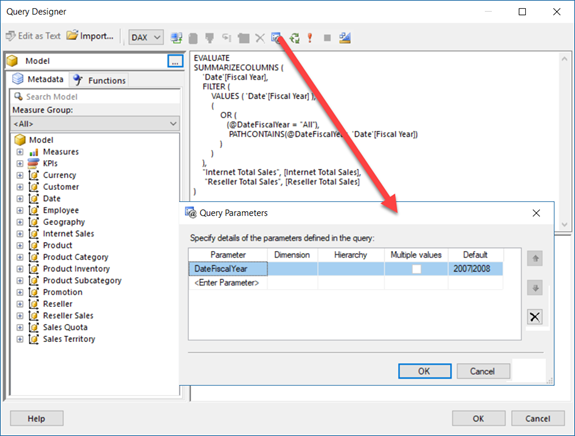
  4. Now open the main DAX report query and switch to Text mode. Promise yourself never to go back to the Graphical mode (the one that lets you drag and drop). Click the Parameters button and reconfigure the parameter by selecting the empty value in the Dimension column. For testing the query inside the query designer, you might want to enter some pipe-delimited values in the Default column.
    011218_0216_SSRSMultiva3.png
  5. Change the main query to support multivalue parameters. The following query highlights the important changes:

    EVALUATE
    SUMMARIZECOLUMNS (
    ‘Date'[Fiscal Year],
    FILTER (
    VALUES ( ‘Date'[Fiscal Year] ),
    (
                OR (
                    ( @DateFiscalYear = “All” ),
                    PATHCONTAINS ( @DateFiscalYear, ‘Date'[Fiscal Year] )
                )
    )
    ),
    “Internet Total Sales”, [Internet Total Sales],
    “Reseller Total Sales”, [Reseller Total Sales]
    )

I removed the variable (VAR) definitions (not needed after simplifying the query). The filter expression uses an OR condition. If the user selects the parameter “All” value, then all rows are returned. If specific values are selected, the PATHCONTAINS function would return TRUE for that row in the filtered column (‘Date'[Fiscal Year] in this case) that matches one of the selected values. If you have more parameters, simply add more FILTER clauses.

I attach a report to demonstrate the changes.

Power BI Writeback

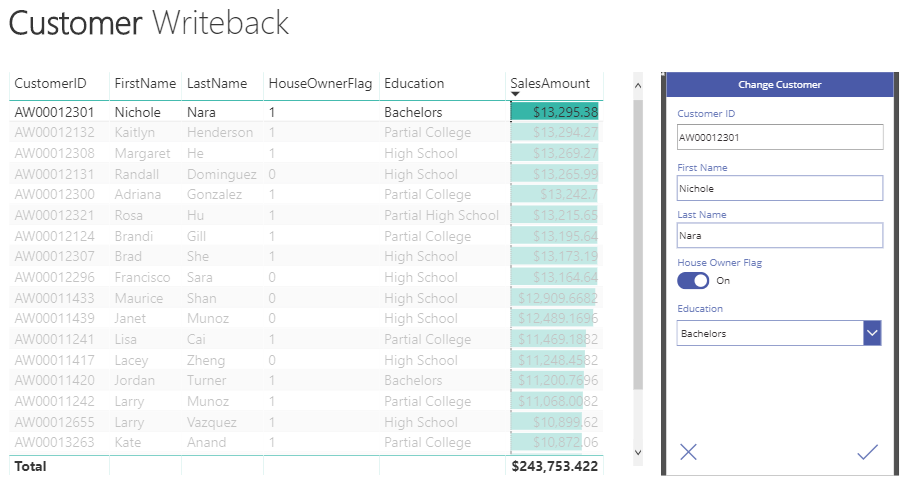
One of the Power BI most prominent strengths is that it’s a part of the much broader Microsoft Data Platform that spans various on-premises and cloud offerings for data storage, processing, and analysis. After the integration with Visio, Power BI just took another leap forward with the introduction of the PowerApps custom visual. Use this visual to bridge the Data Analytics and Developer worlds. Now your Power BI apps can integrate with Line of Business (LOB) applications in versatile ways. Suppose you have a Power BI report that shows sales by customers. As the user browses the data, he realizes that some changes need to be made. Granted, the user can open the appropriate business app and make the changes there, and then go back to the report to see the changes. But read-only reports and are so 20th century. Instead, why can’t we allow the user to make the changes on the report by integrating it with PowerApps? This scenario is commonly referred to as writeback.

010718_1648_PowerBIWrit1.png

This is exactly the approach my Customer Writeback app demonstrates. The user selects a customer in the table and the customer details show up in the Change Customer visual to the right. This is the PowerApps visual that references my Customer Writeback PowerApps app. The user can make changes in the form and save the changes back to the underlying database. Then he can refresh the report to see these changes. If you have experience with PowerApps, implementing this scenario takes minutes. If this is the first time you hear about PowerApps, don’t worry; it’s take much to learn it especially if you have a developer background. Here are the important implementation details:

  1. Implement your Power BI report first. In my case, I implemented the report in Power BI Desktop. I connected live (DirectQuery) to my AdventureWorksDW2012 Azure SQL Database. Connecting live is preferable for writeback reports because the user can just refresh the report to see the updates. If your Power BI Desktop file imports the data, the user would have to wait for the dataset to refresh to sync the data changes.
  2. Deploy the report to Power BI Service (powerbi.com). Currently, only published reports can create new PowerApps apps (Power BI Desktop reports can only connect to existing apps).
  3. Open the report in edit mode. In the Visualizations pane, click the ellipsis (…) button and import the PowerApps custom visual from the Office Store. With the PowerApps visual selected, add the fields that you want to make available to PowerApps. When the report is previewed, Power BI will pass to PowerApps a dataset with these fields.
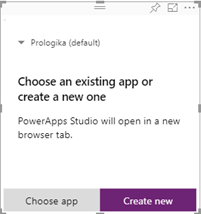
  4. In the PowerApps visual, click Create New to create a new app. This will open the PowerApps Web Studio, but you prefer developing on the desktop, there is also a desktop version of the PowerApps Studio that you can install from the Microsoft Store.
  5. My app is as simple as it could be. All is needed is a single form that populates its fields from the same AdventureWorksDW2012 database. The form uses the following expression for the Item property. Although Power BI passes a dataset, in my case the dataset has only one record, so the First function returns that record. When you create the app, Power BI would create a PowerBIIntegration custom data source, which is what Power BI uses to pass the data. The expression filters the form source data where CustomerID in DimCustomer table matches the Customer ID field pushed by Power BI.
    First(Filter(‘[dbo].[DimCustomer]’, CustomerAlternateKey = First(PowerBIIntegration.Data).CustomerID ))
  6. Your app can use any of the PowerApps controls to visualize the data, including toggles, dropdowns, data pickers, buttons, and so on. Because the Toggle control expects a Boolean field, I couldn’t just submit the form to update the underlying record. Instead, I had to rely on the Patch function to translate the Boolean value to ‘1’ or ‘0’ because that’s the values the DimCustomer table stores.
    Patch(‘[dbo].[DimCustomer]’, First(Filter(‘[dbo].[DimCustomer]’, CustomerAlternateKey = First(PowerBIIntegration.Data).CustomerID )),{FirstName:DataCardValue2.Text,LastName:DataCardValue3.Text,HouseOwnerFlag:If(Toggle1.Value=true, “1”, “0”), EnglishEducation:Education.Selected.Value})
  7. Preview the app to test it as you go. To test it from the Power BI report, you need to publish the app. Before you go live, don’t forget to share the app with the same users that will view your report. One of nice aspects of the Power BI integration with Power Apps is that the custom visual references to the published app so that you can test the changes as you develop. However, one thing I encountered is that sometimes the changes are not immediately reflected, so I had to navigate off the report and come back to it to test the latest changes.

The Power BI integration with PowerApps opens exciting new possibilities and redefines the meaning of a report. Because PowerApps integrate with Microsoft Flow, you can integrate your reports with “smart” applications that you can implement with almost no code! Featuring more than 100 data sources, you can use PowerApps as an integration hub to mash data from almost any place and then embed PowerApps screens in Power BI reports.

I attach the source code of the Customer Writeback app. You can open it in the desktop version of the PowerApps Studio.