How to Test SSRS Data Alerts without Corporate Mail Server
Reporting Services data alerts were introduced in SQL Server 2012 to allow business users to receive e-mail notifications based on rules they specify. Data alerts require SSRS to be configured in SharePoint integration mode. However, you’d probably run SharePoint on a VM for development and demo purposes and you might not have access to a functional mail server. The following steps allow you to configure your VM to test data alerts with a local SMTP server:
- Assuming your SharePoint VM is running Windows Server 2012, open Turn Windows Features On and Off and add the SMTP Server feature. This will install a local SMTP server.
- Open IIS Manager 6.0 and start the SMTP Virtual Server. Configure the SMTP server to allow relay.
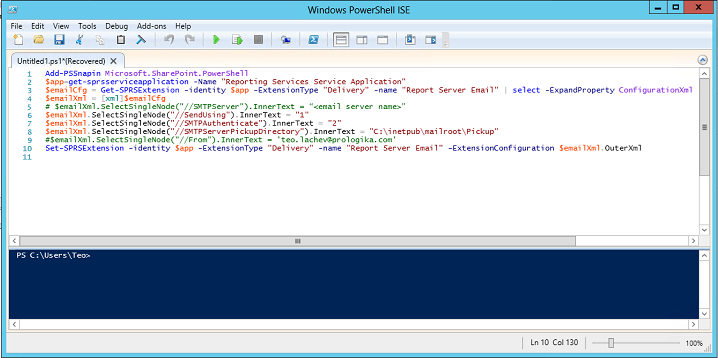
- Because SSRS 2012 integrates natively with SharePoint, you can’t use the report server configuration files to directly change the SSRS settings. Instead, you must use PowerShell as I explained here. Open Windows PowerShell ISE and execute the following script to configure the SSRS e-mail settings. Replace <your SSRS application name> with the name of your SSRS application which you can obtain from the SharePoint Central Administration ð Manage Service Applications. Execute the script.

Add-PSSnapin Microsoft.SharePoint.PowerShell
$app=get-sprsserviceapplication -Name “<your SSRS application name>”
$emailCfg = Get-SPRSExtension -identity $app -ExtensionType “Delivery” -name “Report Server Email” | select -ExpandProperty ConfigurationXml
$emailXml = [xml]$emailCfg
# $emailXml.SelectSingleNode(“//SMTPServer”).InnerText = “<email server name>”
$emailXml.SelectSingleNode(“//SendUsing”).InnerText = “1”
$emailXml.SelectSingleNode(“//SMTPAuthenticate”).InnerText = “2”
$emailXml.SelectSingleNode(“//SMTPServerPickupDirectory”).InnerText = “C:\inetpub\mailroot\Pickup” # You probably don’t need this; I was experimenting with dropping the messages to a pickup folder
$emailXml.SelectSingleNode(“//From”).InnerText = ‘teo.lachev@prologika.com’
Set-SPRSExtension -identity $app -ExtensionType “Delivery” -name “Report Server Email” -ExtensionConfiguration $emailXml.OuterXml
- If you haven’t configured the data alerts before, go to SharePoint Central Administration ð Manage Service Applications ð <Your SSRS Application>, and then click Provision Subscriptions and Alerts. If you have admin permissions to the SQL Server that hosts the SharePoint databases, enter your credentials and click OK to grant the SSRS service account access to the SQL Server Agent (the SQL Server Agent Service must be running for the data alerts to work). If you don’t, then click the Download SQL Script link and give the script to the DBA to execute the script in order to grant the SSRS service account these permissions.
- Now, create a data alert as usual and run it from the Manage Data Alerts page. After you manually run the alert, you shouldn’t see an error in the Status column.

- Go to the SMTP service queue folder, the default one is C:\inetpub\mailroot\Queue. You should see files with extension *.EML. You can open these files with Microsoft Outlook to see the details of the e-mail notification that SSRS sends to the recipient. It should look like the one below. In this case, I’ve create a report that shows the status of the SharePoint timer jobs and I wanted to be notified every time the Status=3.


