Where Are My Storage Pool Disks?
I’ve been doing quite a bit of SQL Server performance work lately, helping customers embrace the cloud. One great feature of Windows Server 2012 and above is the ability to implement a storage pool combining multiple disks. This greatly simplifies disk striping to distribute I/O and deprecates RAID configurations, as explained in more details in the “Performance Guidance for SQL Server in Windows Azure Virtual Machines” whitepaper from Microsoft.
In this case, the client has an A7 Azure VM which allows attaching up to four 1TB data disks. Another great Azure feature is that you only pay for what you use. What it means to you is that you cut cost because you have all of this storage available but you are charged only for the actual storage and not for the capacity.
In the process of configuring the storage pool, you might find that none or some of the disks show up preventing you from creating a new storage pool although you’ve attached them all right and they are there. How do you fix this horrible issue? Delete the disk partitions (also known as volumes). That’s because you can only create a storage pool of uninitialized disks only.
- Right Windows Disk Management.
- Right-click on each disk and click Delete Volume.
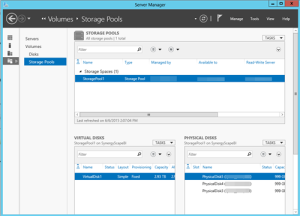
Now you can create your storage pool. In this case, I’ve created one virtual disk that has three physical disks for a total combined storage of 3 TB.