Power BI External Users and Data Security
Power BI lets you share content directly with external users for B2B and B2C scenarios. When the benefits of this sharing option outweigh its limitations (read-only reports, requiring Azure AD federated access, per-user licensing, rendering the report inside Power BI), this is the easiest way to share Power BI content with an external party. However, the documentation, which is otherwise excellent, doesn’t explain the steps required to allow the external user to see only a subset of data when you have a dataset configured for data (RLS) security.
Granting access to an external user to a dataset configured for data security is like the proverbial chicken and egg problem. To grant access to the report, you need to share the report with the user, but you can’t add the user to the security role because the user is not provisioned yet. Hence, you’ll first share a non-sensitive report with the user before you share the actual report.
- Create an organizational workspace. I recommend you create a v2 workspace for the benefits I outlined in my “Power BI Sharing Is Getting Better” blog.
- In Power BI Desktop, import some sample data that is OK for the end user to see. Create a simple report for testing. A dataset is required because for some obscure reason, Power BI will prevent you from sharing an empty report that doesn’t have a dataset. Publish the Power BI Desktop file to powerbi.com.
- Share the non-sensitive report with the external user. At this point, if you examine the user account in Azure Active Directory in the Azure Portal (portal.azure.com), it will show that the user is invited.
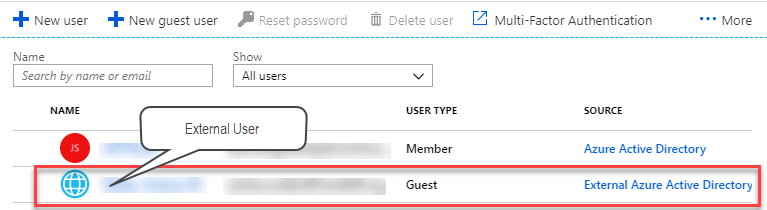
- When the user gets the email, clicks the link, and navigates the prompts, the user will be eventually added to your tenant’s Active Directory and will show as Guest in the External Azure Active Directory source.

- Now you can assign a Power BI Pro license to this user in the Azure Portal. Remember that unless you are on Power BI Premium, any form of sharing requires a Power BI Pro license. One gotcha here is that the Azure Portal might refuse assigning a Power BI Pro license with the following error “License cannot be assigned to a user without a usage location specified.” To fix this horrible issue, go to Azure Active Directory (Users tab), click the external user, click Edit in the Settings section in the user profile, and then use the “Usage location” drop-down to select the country where the user is located.
- At this point, the external user is added to your tenant’s active directory and covered by Power BI Pro license. Next, publish the actual Power BI Desktop file with the sensitive report you want to share. This file should have a role that applies a row filter to one or more tables to enforce data security in a multi-tenant dataset. Once the file is published to powerbi.com, go to the dataset Security setting and add the external user to the role by typing the user’s email.
-
The last step is to share the report with the external user.
TIP: If you have a lot of external users, consider assigning them to a security group so you can grant access to the group instead of individual emails. Also, instead of sharing individual reports and dashboards, use Apps to grant access to the security groups. Note that as I explained in the “Power BI Sharing Is Getting Better” blog, currently you can’t assign viewers as members of the workspace. You must use either dashboard/report sharing or apps.