Refreshing Power BI Datasets from SSIS
Scenario: You use SSIS to load data for on-prem BI solution. As a last step of the ETL pipeline, you want to refresh a Power BI dataset. There’s quite a bit of misinformation on the Internet about how to do this, hence this blog.
Solution: If the dataset is hosted in Power BI Pro workspace, the only way is to use the Power BI REST APIs and there are some good examples out there using PowerShell or Microsoft Automate flows. However, if the dataset is hosted in a Premium-per-user (PPU) or Premium workspace, you can use the SSIS built-in Analysis Services Processing Task. And, no, you don’t need third-party components.
An unattended process can authenticate against Power BI using either a Power BI-licensed account or service principal. I couldn’t get service principals to work with Power BI datasets. More than likely, this is because the service principal needs to be added as an Analysis Services administrator, but we can’t do with Power BI (we can with Azure Analysis Services though). And so, the only option is to use a Power BI regular account (email and password). However, your organization probably uses multi-factor authentication (MFA) to secure access to cloud services. Because the SSIS process will run unattended, no one will be on a lookout to plug in the authentication code. Therefore, you must harass your helpful system administrator to provide you with a user account that is not enabled for MFA.
And so, the steps are:
- Provision a dedicated account in Azure Active Directory. Ideally, the account should have a password that doesn’t expire.
- Assign the account (or the AAD Security group it belongs to as a best practice) the Contributor (or higher Power BI role) to the workspace where the dataset resides.
- Enable the Power BI XMLA feature as ReadWrite.
- On your dev machine, install both the 32-bit and 64-bit versions of the latest Analysis Services MSOLAP providers. You need the 32-bit provider to test in Visual Studio because VS refuses to go 64-bit. However, if you run the package under SQL Agent, you’d need the 64-bit provider.
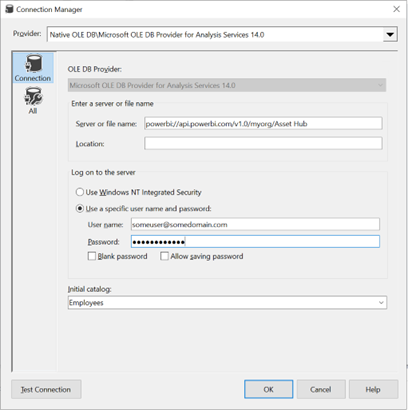
- In Visual Studio, add a connector to the SSIS project that uses SSIS MSOLAP100 Analysis Services provider, which is just a wrapper on top of the SSAS native MSOLAP provider. Configure the connector to connect to the XMLA dataset endpoint (you can copy it from the dataset settings in Power BI Service).
- Configure the SSIS connector to use the “Use a specific user name and password” and plug in the credentials of the dedicated account you configured in step 1.
Gotchas: For some obscure reason, the “Test Connection” button might generate an error, but the processing task should work. Unlike what you might believe, the “Allow saving password” option doesn’t persist the password for security reasons. So, you either need to use an SSIS configuration or retype the password if you close and reopen Visual Studio. Once you deploy the SSIS project to the Integration Services catalog and schedule it with the SQL Agent, make sure to update the connector’s connection string to store the password inside the SQL Agent task.